diff options
Diffstat (limited to 'README.md')
| -rw-r--r-- | README.md | 595 |
1 files changed, 402 insertions, 193 deletions
@@ -1,26 +1,95 @@ -# reveal.js [](https://travis-ci.org/hakimel/reveal.js) +# reveal.js [](https://travis-ci.org/hakimel/reveal.js) <a href="https://slides.com?ref=github"><img src="https://s3.amazonaws.com/static.slid.es/images/slides-github-banner-320x40.png?1" alt="Slides" width="160" height="20"></a> A framework for easily creating beautiful presentations using HTML. [Check out the live demo](http://lab.hakim.se/reveal-js/). -reveal.js comes with a broad range of features including [nested slides](https://github.com/hakimel/reveal.js#markup), [markdown contents](https://github.com/hakimel/reveal.js#markdown), [PDF export](https://github.com/hakimel/reveal.js#pdf-export), [speaker notes](https://github.com/hakimel/reveal.js#speaker-notes) and a [JavaScript API](https://github.com/hakimel/reveal.js#api). It's best viewed in a browser with support for CSS 3D transforms but [fallbacks](https://github.com/hakimel/reveal.js/wiki/Browser-Support) are available to make sure your presentation can still be viewed elsewhere. - - -#### More reading: -- [Installation](#installation): Step-by-step instructions for getting reveal.js running on your computer. +reveal.js comes with a broad range of features including [nested slides](https://github.com/hakimel/reveal.js#markup), [Markdown contents](https://github.com/hakimel/reveal.js#markdown), [PDF export](https://github.com/hakimel/reveal.js#pdf-export), [speaker notes](https://github.com/hakimel/reveal.js#speaker-notes) and a [JavaScript API](https://github.com/hakimel/reveal.js#api). There's also a fully featured visual editor and platform for sharing reveal.js presentations at [slides.com](https://slides.com?ref=github). + +## Table of contents +- [Online Editor](#online-editor) +- [Instructions](#instructions) + - [Markup](#markup) + - [Markdown](#markdown) + - [Element Attributes](#element-attributes) + - [Slide Attributes](#slide-attributes) +- [Configuration](#configuration) +- [Presentation Size](#presentation-size) +- [Dependencies](#dependencies) +- [Ready Event](#ready-event) +- [Auto-sliding](#auto-sliding) +- [Keyboard Bindings](#keyboard-bindings) +- [Touch Navigation](#touch-navigation) +- [Lazy Loading](#lazy-loading) +- [API](#api) + - [Slide Changed Event](#slide-changed-event) + - [Presentation State](#presentation-state) + - [Slide States](#slide-states) + - [Slide Backgrounds](#slide-backgrounds) + - [Parallax Background](#parallax-background) + - [Slide Transitions](#slide-transitions) + - [Internal links](#internal-links) + - [Fragments](#fragments) + - [Fragment events](#fragment-events) + - [Code syntax highlighting](#code-syntax-highlighting) + - [Slide number](#slide-number) + - [Overview mode](#overview-mode) + - [Fullscreen mode](#fullscreen-mode) + - [Embedded media](#embedded-media) + - [Stretching elements](#stretching-elements) + - [postMessage API](#postmessage-api) +- [PDF Export](#pdf-export) +- [Theming](#theming) +- [Speaker Notes](#speaker-notes) + - [Share and Print Speaker Notes](#share-and-print-speaker-notes) + - [Server Side Speaker Notes](#server-side-speaker-notes) +- [Multiplexing](#multiplexing) + - [Master presentation](#master-presentation) + - [Client presentation](#client-presentation) + - [Socket.io server](#socketio-server) +- [MathJax](#mathjax) +- [Installation](#installation) + - [Basic setup](#basic-setup) + - [Full setup](#full-setup) + - [Folder Structure](#folder-structure) +- [License](#license) + +#### More reading - [Changelog](https://github.com/hakimel/reveal.js/releases): Up-to-date version history. - [Examples](https://github.com/hakimel/reveal.js/wiki/Example-Presentations): Presentations created with reveal.js, add your own! - [Browser Support](https://github.com/hakimel/reveal.js/wiki/Browser-Support): Explanation of browser support and fallbacks. +- [Plugins](https://github.com/hakimel/reveal.js/wiki/Plugins,-Tools-and-Hardware): A list of plugins that can be used to extend reveal.js. ## Online Editor -Presentations are written using HTML or markdown but there's also an online editor for those of you who prefer a graphical interface. Give it a try at [http://slid.es](http://slid.es). +Presentations are written using HTML or Markdown but there's also an online editor for those of you who prefer a graphical interface. Give it a try at [https://slides.com](https://slides.com?ref=github). ## Instructions ### Markup -Markup hierarchy needs to be ``<div class="reveal"> <div class="slides"> <section>`` where the ``<section>`` represents one slide and can be repeated indefinitely. If you place multiple ``<section>``'s inside of another ``<section>`` they will be shown as vertical slides. The first of the vertical slides is the "root" of the others (at the top), and it will be included in the horizontal sequence. For example: +Here's a barebones example of a fully working reveal.js presentation: +```html +<html> + <head> + <link rel="stylesheet" href="css/reveal.css"> + <link rel="stylesheet" href="css/theme/white.css"> + </head> + <body> + <div class="reveal"> + <div class="slides"> + <section>Slide 1</section> + <section>Slide 2</section> + </div> + </div> + <script src="js/reveal.js"></script> + <script> + Reveal.initialize(); + </script> + </body> +</html> +``` + +The presentation markup hierarchy needs to be `.reveal > .slides > section` where the `section` represents one slide and can be repeated indefinitely. If you place multiple `section` elements inside of another `section` they will be shown as vertical slides. The first of the vertical slides is the "root" of the others (at the top), and will be included in the horizontal sequence. For example: ```html <div class="reveal"> @@ -36,9 +105,9 @@ Markup hierarchy needs to be ``<div class="reveal"> <div class="slides"> <sectio ### Markdown -It's possible to write your slides using Markdown. To enable Markdown, add the ```data-markdown``` attribute to your ```<section>``` elements and wrap the contents in a ```<script type="text/template">``` like the example below. +It's possible to write your slides using Markdown. To enable Markdown, add the `data-markdown` attribute to your `<section>` elements and wrap the contents in a `<script type="text/template">` like the example below. -This is based on [data-markdown](https://gist.github.com/1343518) from [Paul Irish](https://github.com/paulirish) modified to use [marked](https://github.com/chjj/marked) to support [Github Flavoured Markdown](https://help.github.com/articles/github-flavored-markdown). Sensitive to indentation (avoid mixing tabs and spaces) and line breaks (avoid consecutive breaks). +This is based on [data-markdown](https://gist.github.com/1343518) from [Paul Irish](https://github.com/paulirish) modified to use [marked](https://github.com/chjj/marked) to support [GitHub Flavored Markdown](https://help.github.com/articles/github-flavored-markdown). Sensitive to indentation (avoid mixing tabs and spaces) and line breaks (avoid consecutive breaks). ```html <section data-markdown> @@ -52,15 +121,15 @@ This is based on [data-markdown](https://gist.github.com/1343518) from [Paul Iri #### External Markdown -You can write your content as a separate file and have reveal.js load it at runtime. Note the separator arguments which determine how slides are delimited in the external file. The ```data-charset``` attribute is optional and specifies which charset to use when loading the external file. +You can write your content as a separate file and have reveal.js load it at runtime. Note the separator arguments which determine how slides are delimited in the external file: the `data-separator` attribute defines a regular expression for horizontal slides (defaults to `^\r?\n---\r?\n$`, a newline-bounded horizontal rule) and `data-separator-vertical` defines vertical slides (disabled by default). The `data-separator-notes` attribute is a regular expression for specifying the beginning of the current slide's speaker notes (defaults to `note:`). The `data-charset` attribute is optional and specifies which charset to use when loading the external file. -When used locally, this feature requires that reveal.js [runs from a local web server](#full-setup). +When used locally, this feature requires that reveal.js [runs from a local web server](#full-setup). The following example customises all available options: ```html <section data-markdown="example.md" data-separator="^\n\n\n" - data-vertical="^\n\n" - data-notes="^Note:" + data-separator-vertical="^\n\n" + data-separator-notes="^Note:" data-charset="iso-8859-15"> </section> ``` @@ -86,7 +155,7 @@ Special syntax (in html comment) is available for adding attributes to the slide <section data-markdown> <script type="text/template"> <!-- .slide: data-background="#ff0000" --> - Mardown content + Markdown content </script> </section> ``` @@ -129,6 +198,9 @@ Reveal.initialize({ // Change the presentation direction to be RTL rtl: false, + // Randomizes the order of slides each time the presentation loads + shuffle: false, + // Turns fragments on and off globally fragments: true, @@ -136,6 +208,13 @@ Reveal.initialize({ // i.e. contained within a limited portion of the screen embedded: false, + // Flags if we should show a help overlay when the questionmark + // key is pressed + help: true, + + // Flags if speaker notes should be visible to all viewers + showNotes: false, + // Number of milliseconds between automatically proceeding to the // next slide, disabled when set to 0, this value can be overwritten // by using a data-autoslide attribute on your slides @@ -144,6 +223,9 @@ Reveal.initialize({ // Stop auto-sliding after user input autoSlideStoppable: true, + // Use this method for navigation when auto-sliding + autoSlideMethod: Reveal.navigateNext, + // Enable slide navigation via mouse wheel mouseWheel: false, @@ -154,13 +236,13 @@ Reveal.initialize({ previewLinks: false, // Transition style - transition: 'default', // default/cube/page/concave/zoom/linear/fade/none + transition: 'default', // none/fade/slide/convex/concave/zoom // Transition speed transitionSpeed: 'default', // default/fast/slow // Transition style for full page slide backgrounds - backgroundTransition: 'default', // default/none/slide/concave/convex/zoom + backgroundTransition: 'default', // none/fade/slide/convex/concave/zoom // Number of slides away from the current that are visible viewDistance: 3, @@ -169,14 +251,17 @@ Reveal.initialize({ parallaxBackgroundImage: '', // e.g. "'https://s3.amazonaws.com/hakim-static/reveal-js/reveal-parallax-1.jpg'" // Parallax background size - parallaxBackgroundSize: '' // CSS syntax, e.g. "2100px 900px" + parallaxBackgroundSize: '', // CSS syntax, e.g. "2100px 900px" + // Number of pixels to move the parallax background per slide + // - Calculated automatically unless specified + // - Set to 0 to disable movement along an axis + parallaxBackgroundHorizontal: null, + parallaxBackgroundVertical: null }); ``` -Note that the new default vertical centering option will break compatibility with slides that were using transitions with backgrounds (`cube` and `page`). To restore the previous behavior, set `center` to `false`. - The configuration can be updated after initialization using the ```configure``` method: @@ -189,6 +274,34 @@ Reveal.configure({ autoSlide: 5000 }); ``` +### Presentation Size + +All presentations have a normal size, that is the resolution at which they are authored. The framework will automatically scale presentations uniformly based on this size to ensure that everything fits on any given display or viewport. + +See below for a list of configuration options related to sizing, including default values: + +```javascript +Reveal.initialize({ + + ... + + // The "normal" size of the presentation, aspect ratio will be preserved + // when the presentation is scaled to fit different resolutions. Can be + // specified using percentage units. + width: 960, + height: 700, + + // Factor of the display size that should remain empty around the content + margin: 0.1, + + // Bounds for smallest/largest possible scale to apply to content + minScale: 0.2, + maxScale: 1.5 + +}); +``` + + ### Dependencies Reveal.js doesn't _rely_ on any third party scripts to work but a few optional libraries are included by default. These libraries are loaded as dependencies in the order they appear, for example: @@ -207,13 +320,10 @@ Reveal.initialize({ { src: 'plugin/highlight/highlight.js', async: true, callback: function() { hljs.initHighlightingOnLoad(); } }, // Zoom in and out with Alt+click - { src: 'plugin/zoom-js/zoom.js', async: true, condition: function() { return !!document.body.classList; } }, + { src: 'plugin/zoom-js/zoom.js', async: true }, // Speaker notes - { src: 'plugin/notes/notes.js', async: true, condition: function() { return !!document.body.classList; } }, - - // Remote control your reveal.js presentation using a touch device - { src: 'plugin/remotes/remotes.js', async: true, condition: function() { return !!document.body.classList; } }, + { src: 'plugin/notes/notes.js', async: true }, // MathJax { src: 'plugin/math/math.js', async: true } @@ -228,37 +338,21 @@ You can add your own extensions using the same syntax. The following properties - **condition**: [optional] Function which must return true for the script to be loaded -### Presentation Size - -All presentations have a normal size, that is the resolution at which they are authored. The framework will automatically scale presentations uniformly based on this size to ensure that everything fits on any given display or viewport. +### Ready Event -See below for a list of configuration options related to sizing, including default values: +A 'ready' event is fired when reveal.js has loaded all non-async dependencies and is ready to start navigating. To check if reveal.js is already 'ready' you can call `Reveal.isReady()`. ```javascript -Reveal.initialize({ - - ... - - // The "normal" size of the presentation, aspect ratio will be preserved - // when the presentation is scaled to fit different resolutions. Can be - // specified using percentage units. - width: 960, - height: 700, - - // Factor of the display size that should remain empty around the content - margin: 0.1, - - // Bounds for smallest/largest possible scale to apply to content - minScale: 0.2, - maxScale: 1.0 - -}); +Reveal.addEventListener( 'ready', function( event ) { + // event.currentSlide, event.indexh, event.indexv +} ); ``` +Note that we also add a `.ready` class to the `.reveal` element so that you can hook into this with CSS. ### Auto-sliding -Presentations can be configure to progress through slides automatically, without any user input. To enable this you will need to tell the framework how many milliseconds it should wait between slides: +Presentations can be configured to progress through slides automatically, without any user input. To enable this you will need to tell the framework how many milliseconds it should wait between slides: ```javascript // Slide every five seconds @@ -266,15 +360,22 @@ Reveal.configure({ autoSlide: 5000 }); ``` +When this is turned on a control element will appear that enables users to pause and resume auto-sliding. Alternatively, sliding can be paused or resumed by pressing »a« on the keyboard. Sliding is paused automatically as soon as the user starts navigating. You can disable these controls by specifying ```autoSlideStoppable: false``` in your reveal.js config. -When this is turned on a control element will appear that enables users to pause and resume auto-sliding. Sliding is also paused automatically as soon as the user starts navigating. You can disable these controls by specifying ```autoSlideStoppable: false``` in your reveal.js config. - -You can also override the slide duration for individual slides by using the ```data-autoslide``` attribute on individual sections: +You can also override the slide duration for individual slides and fragments by using the ```data-autoslide``` attribute: ```html -<section data-autoslide="10000">This will remain on screen for 10 seconds</section> +<section data-autoslide="2000"> + <p>After 2 seconds the first fragment will be shown.</p> + <p class="fragment" data-autoslide="10000">After 10 seconds the next fragment will be shown.</p> + <p class="fragment">Now, the fragment is displayed for 2 seconds before the next slide is shown.</p> +</section> ``` +To override the method used for navigation when auto-sliding, you can specify the ```autoSlideMethod``` setting. To only navigate along the top layer and ignore vertical slides, set this to ```Reveal.navigateRight```. + +Whenever the auto-slide mode is resumed or paused the ```autoslideresumed``` and ```autoslidepaused``` events are fired. + ### Keyboard Bindings @@ -290,10 +391,34 @@ Reveal.configure({ }); ``` +### Touch Navigation + +You can swipe to navigate through a presentation on any touch-enabled device. Horizontal swipes change between horizontal slides, vertical swipes change between vertical slides. If you wish to disable this you can set the `touch` config option to false when initializing reveal.js. + +If there's some part of your content that needs to remain accessible to touch events you'll need to highlight this by adding a `data-prevent-swipe` attribute to the element. One common example where this is useful is elements that need to be scrolled. + + +### Lazy Loading + +When working on presentation with a lot of media or iframe content it's important to load lazily. Lazy loading means that reveal.js will only load content for the few slides nearest to the current slide. The number of slides that are preloaded is determined by the `viewDistance` configuration option. + +To enable lazy loading all you need to do is change your "src" attributes to "data-src" as shown below. This is supported for image, video, audio and iframe elements. Lazy loaded iframes will also unload when the containing slide is no longer visible. + +```html +<section> + <img data-src="image.png"> + <iframe data-src="http://hakim.se"></iframe> + <video> + <source data-src="video.webm" type="video/webm" /> + <source data-src="video.mp4" type="video/mp4" /> + </video> +</section> +``` + ### API -The ``Reveal`` class provides a JavaScript API for controlling navigation and reading state: +The ``Reveal`` object exposes a JavaScript API for controlling navigation and reading state: ```javascript // Navigation @@ -306,35 +431,49 @@ Reveal.prev(); Reveal.next(); Reveal.prevFragment(); Reveal.nextFragment(); + +// Randomize the order of slides +Reveal.shuffle(); + +// Shows a help overlay with keyboard shortcuts +Reveal.showHelp(); + +// Toggle presentation states, optionally pass true/false to force on/off Reveal.toggleOverview(); Reveal.togglePause(); +Reveal.toggleAutoSlide(); + +// Change a config value at runtime +Reveal.configure({ controls: true }); + +// Returns the present configuration options +Reveal.getConfig(); + +// Fetch the current scale of the presentation +Reveal.getScale(); // Retrieves the previous and current slide elements Reveal.getPreviousSlide(); Reveal.getCurrentSlide(); Reveal.getIndices(); // { h: 0, v: 0 } } +Reveal.getProgress(); // 0-1 +Reveal.getTotalSlides(); + +// Returns the speaker notes for the current slide +Reveal.getSlideNotes(); // State checks Reveal.isFirstSlide(); Reveal.isLastSlide(); Reveal.isOverview(); Reveal.isPaused(); -``` - -### Ready Event - -The 'ready' event is fired when reveal.js has loaded all (synchronous) dependencies and is ready to start navigating. - -```javascript -Reveal.addEventListener( 'ready', function( event ) { - // event.currentSlide, event.indexh, event.indexv -} ); +Reveal.isAutoSliding(); ``` ### Slide Changed Event -An 'slidechanged' event is fired each time the slide is changed (regardless of state). The event object holds the index values of the current slide as well as a reference to the previous and current slide HTML nodes. +A 'slidechanged' event is fired each time the slide is changed (regardless of state). The event object holds the index values of the current slide as well as a reference to the previous and current slide HTML nodes. Some libraries, like MathJax (see [#226](https://github.com/hakimel/reveal.js/issues/226#issuecomment-10261609)), get confused by the transforms and display states of slides. Often times, this can be fixed by calling their update or render function from this callback. @@ -344,8 +483,24 @@ Reveal.addEventListener( 'slidechanged', function( event ) { } ); ``` +### Presentation State + +The presentation's current state can be fetched by using the `getState` method. A state object contains all of the information required to put the presentation back as it was when `getState` was first called. Sort of like a snapshot. It's a simple object that can easily be stringified and persisted or sent over the wire. + +```javascript +Reveal.slide( 1 ); +// we're on slide 1 + +var state = Reveal.getState(); + +Reveal.slide( 3 ); +// we're on slide 3 + +Reveal.setState( state ); +// we're back on slide 1 +``` -### States +### Slide States If you set ``data-state="somestate"`` on a slide ``<section>``, "somestate" will be applied as a class on the document element when that slide is opened. This allows you to apply broad style changes to the page based on the active slide. @@ -359,26 +514,64 @@ Reveal.addEventListener( 'somestate', function() { ### Slide Backgrounds -Slides are contained within a limited portion of the screen by default to allow them to fit any display and scale uniformly. You can apply full page background colors or images by applying a ```data-background``` attribute to your ```<section>``` elements. Below are a few examples. +Slides are contained within a limited portion of the screen by default to allow them to fit any display and scale uniformly. You can apply full page backgrounds outside of the slide area by adding a ```data-background``` attribute to your ```<section>``` elements. Four different types of backgrounds are supported: color, image, video and iframe. + +##### Color Backgrounds +All CSS color formats are supported, like rgba() or hsl(). +```html +<section data-background-color="#ff0000"> + <h2>Color</h2> +</section> +``` + +##### Image Backgrounds +By default, background images are resized to cover the full page. Available options: +| Attribute | Default | Description | +| :--------------------------- | :--------- | :---------- | +| data-background-image | | URL of the image to show. GIFs restart when the slide opens. | +| data-background-size | cover | See [background-size](https://developer.mozilla.org/docs/Web/CSS/background-size) on MDN. | +| data-background-position | center | See [background-position](https://developer.mozilla.org/docs/Web/CSS/background-position) on MDN. | +| data-background-repeat | no-repeat | See [background-repeat](https://developer.mozilla.org/docs/Web/CSS/background-repeat) on MDN. | ```html -<section data-background="#ff0000"> - <h2>All CSS color formats are supported, like rgba() or hsl().</h2> +<section data-background-image="http://example.com/image.png"> + <h2>Image</h2> </section> -<section data-background="http://example.com/image.png"> - <h2>This slide will have a full-size background image.</h2> +<section data-background-image="http://example.com/image.png" data-background-size="100px" data-background-repeat="repeat"> + <h2>This background image will be sized to 100px and repeated</h2> +</section> +``` + +##### Video Backgrounds +Automatically plays a full size video behind the slide. + +| Attribute | Default | Description | +| :--------------------------- | :------ | :---------- | +| data-background-video | | A single video source, or a comma separated list of video sources. | +| data-background-video-loop | false | Flags if the video should play repeatedly. | +| data-background-video-muted | false | Flags if the audio should be muted. | + +```html +<section data-background-video="https://s3.amazonaws.com/static.slid.es/site/homepage/v1/homepage-video-editor.mp4,https://s3.amazonaws.com/static.slid.es/site/homepage/v1/homepage-video-editor.webm" data-background-video-loop data-background-video-muted> + <h2>Video</h2> </section> -<section data-background="http://example.com/image.png" data-background-size="100px" data-background-repeat="repeat"> - <h2>This background image will be sized to 100px and repeated.</h2> +``` + +##### Iframe Backgrounds +Embeds a web page as a background. Note that since the iframe is in the background layer, behind your slides, it is not possible to interact with the embedded page. +```html +<section data-background-iframe="https://slides.com"> + <h2>Iframe</h2> </section> ``` +##### Background Transitions Backgrounds transition using a fade animation by default. This can be changed to a linear sliding transition by passing ```backgroundTransition: 'slide'``` to the ```Reveal.initialize()``` call. Alternatively you can set ```data-background-transition``` on any section with a background to override that specific transition. ### Parallax Background -If you want to use a parallax scrolling background, set the two following config properties when initializing reveal.js (the third one is optional). +If you want to use a parallax scrolling background, set the first two config properties below when initializing reveal.js (the other two are optional). ```javascript Reveal.initialize({ @@ -389,8 +582,11 @@ Reveal.initialize({ // Parallax background size parallaxBackgroundSize: '', // CSS syntax, e.g. "2100px 900px" - currently only pixels are supported (don't use % or auto) - // This slide transition gives best results: - transition: linear + // Number of pixels to move the parallax background per slide + // - Calculated automatically unless specified + // - Set to 0 to disable movement along an axis + parallaxBackgroundHorizontal: 200, + parallaxBackgroundVertical: 50 }); ``` @@ -412,7 +608,25 @@ The global presentation transition is set using the ```transition``` config valu </section> ``` -Note that this does not work with the page and cube transitions. +You can also use different in and out transitions for the same slide: + +```html +<section data-transition="slide"> + The train goes on … +</section> +<section data-transition="slide"> + and on … +</section> +<section data-transition="slide-in fade-out"> + and stops. +</section> +<section data-transition="fade-in slide-out"> + (Passengers entering and leaving) +</section> +<section data-transition="slide"> + And it starts again. +</section> +``` ### Internal links @@ -445,8 +659,8 @@ The default fragment style is to start out invisible and fade in. This style can <section> <p class="fragment grow">grow</p> <p class="fragment shrink">shrink</p> - <p class="fragment roll-in">roll-in</p> <p class="fragment fade-out">fade-out</p> + <p class="fragment fade-up">fade-up (also down, left and right!)</p> <p class="fragment current-visible">visible only once</p> <p class="fragment highlight-current-blue">blue only once</p> <p class="fragment highlight-red">highlight-red</p> @@ -492,15 +706,15 @@ Reveal.addEventListener( 'fragmenthidden', function( event ) { ### Code syntax highlighting -By default, Reveal is configured with [highlight.js](http://softwaremaniacs.org/soft/highlight/en/) for code syntax highlighting. Below is an example with clojure code that will be syntax highlighted. When the `data-trim` attribute is present surrounding whitespace is automatically removed. +By default, Reveal is configured with [highlight.js](https://highlightjs.org/) for code syntax highlighting. Below is an example with clojure code that will be syntax highlighted. When the `data-trim` attribute is present, surrounding whitespace is automatically removed. HTML will be escaped by default. To avoid this, for example if you are using `<mark>` to call out a line of code, add the `data-noescape` attribute to the `<code>` element. ```html <section> - <pre><code data-trim> + <pre><code data-trim data-noescape> (def lazy-fib (concat [0 1] - ((fn rfib [a b] + <mark>((fn rfib [a b]</mark> (lazy-cons (+ a b) (rfib b (+ a b)))) 0 1))) </code></pre> </section> @@ -510,7 +724,16 @@ By default, Reveal is configured with [highlight.js](http://softwaremaniacs.org/ If you would like to display the page number of the current slide you can do so using the ```slideNumber``` configuration value. ```javascript +// Shows the slide number using default formatting Reveal.configure({ slideNumber: true }); + +// Slide number formatting can be configured using these variables: +// "h.v": horizontal . vertical slide number (default) +// "h/v": horizontal / vertical slide number +// "c": flattened slide number +// "c/t": flattened slide number / total slides +Reveal.configure({ slideNumber: 'c/t' }); + ``` @@ -558,36 +781,76 @@ Limitations: - Only one descendant per slide section can be stretched +### postMessage API +The framework has a built-in postMessage API that can be used when communicating with a presentation inside of another window. Here's an example showing how you'd make a reveal.js instance in the given window proceed to slide 2: + +```javascript +<window>.postMessage( JSON.stringify({ method: 'slide', args: [ 2 ] }), '*' ); +``` + +When reveal.js runs inside of an iframe it can optionally bubble all of its events to the parent. Bubbled events are stringified JSON with three fields: namespace, eventName and state. Here's how you subscribe to them from the parent window: + +```javascript +window.addEventListener( 'message', function( event ) { + var data = JSON.parse( event.data ); + if( data.namespace === 'reveal' && data.eventName ==='slidechanged' ) { + // Slide changed, see data.state for slide number + } +} ); +``` + +This cross-window messaging can be toggled on or off using configuration flags. + +```javascript +Reveal.initialize({ + ..., + + // Exposes the reveal.js API through window.postMessage + postMessage: true, + + // Dispatches all reveal.js events to the parent window through postMessage + postMessageEvents: false +}); +``` + + ## PDF Export -Presentations can be exported to PDF via a special print stylesheet. This feature requires that you use [Google Chrome](http://google.com/chrome). -Here's an example of an exported presentation that's been uploaded to SlideShare: http://www.slideshare.net/hakimel/revealjs-13872948. +Presentations can be exported to PDF via a special print stylesheet. This feature requires that you use [Google Chrome](http://google.com/chrome) or [Chromium](https://www.chromium.org/Home) and to be serving the presention from a webserver. +Here's an example of an exported presentation that's been uploaded to SlideShare: http://www.slideshare.net/hakimel/revealjs-300. + +Export dimensions are inferred from the configured [presentation size](#presentation-size). Slides that are too tall to fit within a single page will expand onto multiple pages. You can limit how many pages a slide may expand onto using the `pdfMaxPagesPerSlide` config option, for example `Reveal.configure({ pdfMaxPagesPerSlide: 1 })` ensures that no slide ever grows to more than one printed page. -1. Open your presentation with [css/print/pdf.css](https://github.com/hakimel/reveal.js/blob/master/css/print/pdf.css) included on the page. The default index HTML lets you add *print-pdf* anywhere in the query to include the stylesheet, for example: [lab.hakim.se/reveal-js?print-pdf](http://lab.hakim.se/reveal-js?print-pdf). -2. Open the in-browser print dialog (CMD+P). +1. Open your presentation with `print-pdf` included in the query string i.e. http://localhost:8000/?print-pdf#/. This triggers the default index HTML to load the PDF print stylesheet ([css/print/pdf.css](https://github.com/hakimel/reveal.js/blob/master/css/print/pdf.css)). You can test this with [lab.hakim.se/reveal-js?print-pdf](http://lab.hakim.se/reveal-js?print-pdf). +2. Open the in-browser print dialog (CTRL/CMD+P). 3. Change the **Destination** setting to **Save as PDF**. 4. Change the **Layout** to **Landscape**. 5. Change the **Margins** to **None**. -6. Click **Save**. +6. Enable the **Background graphics** option. +7. Click **Save**. -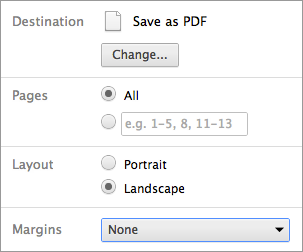 +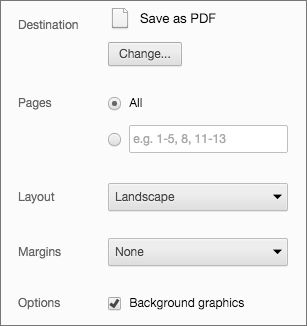 + +Alternatively you can use the [decktape](https://github.com/astefanutti/decktape) project. ## Theming The framework comes with a few different themes included: -- default: Gray background, white text, blue links +- black: Black background, white text, blue links (default theme) +- white: White background, black text, blue links +- league: Gray background, white text, blue links (default theme for reveal.js < 3.0.0) - beige: Beige background, dark text, brown links -- sky: Blue background, thin white text, blue links +- sky: Blue background, thin dark text, blue links - night: Black background, thick white text, orange links - serif: Cappuccino background, gray text, brown links - simple: White background, black text, blue links - solarized: Cream-colored background, dark green text, blue links -Each theme is available as a separate stylesheet. To change theme you will need to replace **default** below with your desired theme name in index.html: +Each theme is available as a separate stylesheet. To change theme you will need to replace **black** below with your desired theme name in index.html: ```html -<link rel="stylesheet" href="css/theme/default.css" id="theme"> +<link rel="stylesheet" href="css/theme/black.css" id="theme"> ``` If you want to add a theme of your own see the instructions here: [/css/theme/README.md](https://github.com/hakimel/reveal.js/blob/master/css/theme/README.md). @@ -597,8 +860,12 @@ If you want to add a theme of your own see the instructions here: [/css/theme/RE reveal.js comes with a speaker notes plugin which can be used to present per-slide notes in a separate browser window. The notes window also gives you a preview of the next upcoming slide so it may be helpful even if you haven't written any notes. Press the 's' key on your keyboard to open the notes window. +A speaker timer starts as soon as the speaker view is opened. You can reset it to 00:00:00 at any time by simply clicking/tapping on it. + Notes are defined by appending an ```<aside>``` element to a slide as seen below. You can add the ```data-markdown``` attribute to the aside element if you prefer writing notes using Markdown. +Alternatively you can add your notes in a `data-notes` attribute on the slide. Like `<section data-notes="Something important"></section>`. + When used locally, this feature requires that reveal.js [runs from a local web server](#full-setup). ```html @@ -614,7 +881,7 @@ When used locally, this feature requires that reveal.js [runs from a local web s If you're using the external Markdown plugin, you can add notes with the help of a special delimiter: ```html -<section data-markdown="example.md" data-separator="^\n\n\n" data-vertical="^\n\n" data-notes="^Note:"></section> +<section data-markdown="example.md" data-separator="^\n\n\n" data-separator-vertical="^\n\n" data-separator-notes="^Note:"></section> # Title ## Sub-title @@ -625,6 +892,12 @@ Note: This will only display in the notes window. ``` +#### Share and Print Speaker Notes + +Notes are only visible to the speaker inside of the speaker view. If you wish to share your notes with others you can initialize reveal.js with the `showNotes` config value set to `true`. Notes will appear along the bottom of the presentations. + +When `showNotes` is enabled notes are also included when you [export to PDF](https://github.com/hakimel/reveal.js#pdf-export). By default, notes are printed in a semi-transparent box on top of slide. If you'd rather print them on a separate page after the slide, set `showNotes: "separate-page"`. + ## Server Side Speaker Notes In some cases it can be desirable to run notes on a separate device from the one you're presenting on. The Node.js-based notes plugin lets you do this using the same note definitions as its client side counterpart. Include the required scripts by adding the following dependencies: @@ -642,14 +915,14 @@ Reveal.initialize({ Then: -1. Install [Node.js](http://nodejs.org/) +1. Install [Node.js](http://nodejs.org/) (1.0.0 or later) 2. Run ```npm install``` 3. Run ```node plugin/notes-server``` ## Multiplexing -The multiplex plugin allows your audience to view the slides of the presentation you are controlling on their own phone, tablet or laptop. As the master presentation navigates the slides, all client presentations will update in real time. See a demo at [http://revealjs.jit.su/](http://revealjs.jit.su). +The multiplex plugin allows your audience to view the slides of the presentation you are controlling on their own phone, tablet or laptop. As the master presentation navigates the slides, all client presentations will update in real time. See a demo at [https://reveal-js-multiplex-ccjbegmaii.now.sh/](https://reveal-js-multiplex-ccjbegmaii.now.sh/). The multiplex plugin needs the following 3 things to operate: @@ -660,7 +933,7 @@ The multiplex plugin needs the following 3 things to operate: More details: #### Master presentation -Served from a static file server accessible (preferably) only to the presenter. This need only be on your (the presenter's) computer. (It's safer to run the master presentation from your own computer, so if the venue's Internet goes down it doesn't stop the show.) An example would be to execute the following commands in the directory of your master presentation: +Served from a static file server accessible (preferably) only to the presenter. This need only be on your (the presenter's) computer. (It's safer to run the master presentation from your own computer, so if the venue's Internet goes down it doesn't stop the show.) An example would be to execute the following commands in the directory of your master presentation: 1. ```npm install node-static``` 2. ```static``` @@ -678,12 +951,12 @@ Reveal.initialize({ // Example values. To generate your own, see the socket.io server instructions. secret: '13652805320794272084', // Obtained from the socket.io server. Gives this (the master) control of the presentation id: '1ea875674b17ca76', // Obtained from socket.io server - url: 'revealjs.jit.su:80' // Location of socket.io server + url: 'https://reveal-js-multiplex-ccjbegmaii.now.sh' // Location of socket.io server }, // Don't forget to add the dependencies dependencies: [ - { src: '//cdnjs.cloudflare.com/ajax/libs/socket.io/0.9.10/socket.io.min.js', async: true }, + { src: '//cdn.socket.io/socket.io-1.3.5.js', async: true }, { src: 'plugin/multiplex/master.js', async: true }, // and if you want speaker notes @@ -706,12 +979,12 @@ Reveal.initialize({ // Example values. To generate your own, see the socket.io server instructions. secret: null, // null so the clients do not have control of the master presentation id: '1ea875674b17ca76', // id, obtained from socket.io server - url: 'revealjs.jit.su:80' // Location of socket.io server + url: 'https://reveal-js-multiplex-ccjbegmaii.now.sh' // Location of socket.io server }, // Don't forget to add the dependencies dependencies: [ - { src: '//cdnjs.cloudflare.com/ajax/libs/socket.io/0.9.10/socket.io.min.js', async: true }, + { src: '//cdn.socket.io/socket.io-1.3.5.js', async: true }, { src: 'plugin/multiplex/client.js', async: true } // other dependencies... @@ -725,15 +998,15 @@ Server that receives the slideChanged events from the master presentation and br 1. ```npm install``` 2. ```node plugin/multiplex``` -Or you use the socket.io server at [http://revealjs.jit.su](http://revealjs.jit.su). +Or you use the socket.io server at [https://reveal-js-multiplex-ccjbegmaii.now.sh/](https://reveal-js-multiplex-ccjbegmaii.now.sh/). -You'll need to generate a unique secret and token pair for your master and client presentations. To do so, visit ```http://example.com/token```, where ```http://example.com``` is the location of your socket.io server. Or if you're going to use the socket.io server at [http://revealjs.jit.su](http://revealjs.jit.su), visit [http://revealjs.jit.su/token](http://revealjs.jit.su/token). +You'll need to generate a unique secret and token pair for your master and client presentations. To do so, visit ```http://example.com/token```, where ```http://example.com``` is the location of your socket.io server. Or if you're going to use the socket.io server at [https://reveal-js-multiplex-ccjbegmaii.now.sh/](https://reveal-js-multiplex-ccjbegmaii.now.sh/), visit [https://reveal-js-multiplex-ccjbegmaii.now.sh/token](https://reveal-js-multiplex-ccjbegmaii.now.sh/token). -You are very welcome to point your presentations at the Socket.io server running at [http://revealjs.jit.su](http://revealjs.jit.su), but availability and stability are not guaranteed. For anything mission critical I recommend you run your own server. It is simple to deploy to nodejitsu, heroku, your own environment, etc. +You are very welcome to point your presentations at the Socket.io server running at [https://reveal-js-multiplex-ccjbegmaii.now.sh/](https://reveal-js-multiplex-ccjbegmaii.now.sh/), but availability and stability are not guaranteed. For anything mission critical I recommend you run your own server. It is simple to deploy to nodejitsu, heroku, your own environment, etc. ##### socket.io server as file static server -The socket.io server can play the role of static file server for your client presentation, as in the example at [http://revealjs.jit.su](http://revealjs.jit.su). (Open [http://revealjs.jit.su](http://revealjs.jit.su) in two browsers. Navigate through the slides on one, and the other will update to match.) +The socket.io server can play the role of static file server for your client presentation, as in the example at [https://reveal-js-multiplex-ccjbegmaii.now.sh/](https://reveal-js-multiplex-ccjbegmaii.now.sh/). (Open [https://reveal-js-multiplex-ccjbegmaii.now.sh/](https://reveal-js-multiplex-ccjbegmaii.now.sh/) in two browsers. Navigate through the slides on one, and the other will update to match.) Example configuration: ```javascript @@ -749,14 +1022,14 @@ Reveal.initialize({ // Don't forget to add the dependencies dependencies: [ - { src: '//cdnjs.cloudflare.com/ajax/libs/socket.io/0.9.10/socket.io.min.js', async: true }, + { src: '//cdn.socket.io/socket.io-1.3.5.js', async: true }, { src: 'plugin/multiplex/client.js', async: true } // other dependencies... ] ``` -It can also play the role of static file server for your master presentation and client presentations at the same time (as long as you don't want to use speaker notes). (Open [http://revealjs.jit.su](http://revealjs.jit.su) in two browsers. Navigate through the slides on one, and the other will update to match. Navigate through the slides on the second, and the first will update to match.) This is probably not desirable, because you don't want your audience to mess with your slides while you're presenting. ;) +It can also play the role of static file server for your master presentation and client presentations at the same time (as long as you don't want to use speaker notes). (Open [https://reveal-js-multiplex-ccjbegmaii.now.sh/](https://reveal-js-multiplex-ccjbegmaii.now.sh/) in two browsers. Navigate through the slides on one, and the other will update to match. Navigate through the slides on the second, and the first will update to match.) This is probably not desirable, because you don't want your audience to mess with your slides while you're presenting. ;) Example configuration: ```javascript @@ -772,7 +1045,7 @@ Reveal.initialize({ // Don't forget to add the dependencies dependencies: [ - { src: '//cdnjs.cloudflare.com/ajax/libs/socket.io/0.9.10/socket.io.min.js', async: true }, + { src: '//cdn.socket.io/socket.io-1.3.5.js', async: true }, { src: 'plugin/multiplex/master.js', async: true }, { src: 'plugin/multiplex/client.js', async: true } @@ -781,56 +1054,11 @@ Reveal.initialize({ }); ``` -## Leap Motion -The Leap Motion plugin lets you utilize your [Leap Motion](https://www.leapmotion.com/) device to control basic navigation of your presentation. The gestures currently supported are: - -##### 1 to 2 fingers -Pointer — Point to anything on screen. Move your finger past the device to expand the pointer. - -##### 1 hand + 3 or more fingers (left/right/up/down) -Navigate through your slides. See config options to invert movements. - -##### 2 hands upwards -Toggle the overview mode. Do it a second time to exit the overview. - -#### Config Options -You can edit the following options: - -| Property | Default | Description -| ----------------- |:-----------------:| :------------- -| autoCenter | true | Center the pointer based on where you put your finger into the leap motions detection field. -| gestureDelay | 500 | How long to delay between gestures in milliseconds. -| naturalSwipe | true | Swipe as though you were touching a touch screen. Set to false to invert. -| pointerColor | #00aaff | The color of the pointer. -| pointerOpacity | 0.7 | The opacity of the pointer. -| pointerSize | 15 | The minimum height and width of the pointer. -| pointerTolerance | 120 | Bigger = slower pointer. - - -Example configuration: -```js -Reveal.initialize({ - - // other options... - - leap: { - naturalSwipe : false, // Invert swipe gestures - pointerOpacity : 0.5, // Set pointer opacity to 0.5 - pointerColor : '#d80000' // Red pointer - }, - - dependencies: [ - { src: 'plugin/leap/leap.js', async: true } - ] - -}); -``` - ## MathJax If you want to display math equations in your presentation you can easily do so by including this plugin. The plugin is a very thin wrapper around the [MathJax](http://www.mathjax.org/) library. To use it you'll need to include it as a reveal.js dependency, [find our more about dependencies here](#dependencies). -The plugin defaults to using [LaTeX](http://en.wikipedia.org/wiki/LaTeX) but that can be adjusted through the ```math``` configuration object. Note that MathJax is loaded from a remote server. If you want to use it offline you'll need to download a copy of the library and adjust the ```mathjax``` configuration value. +The plugin defaults to using [LaTeX](http://en.wikipedia.org/wiki/LaTeX) but that can be adjusted through the ```math``` configuration object. Note that MathJax is loaded from a remote server. If you want to use it offline you'll need to download a copy of the library and adjust the ```mathjax``` configuration value. Below is an example of how the plugin can be configured. If you don't intend to change these values you do not need to include the ```math``` config object at all. @@ -840,10 +1068,10 @@ Reveal.initialize({ // other options ... math: { - mathjax: 'http://cdn.mathjax.org/mathjax/latest/MathJax.js', + mathjax: 'https://cdn.mathjax.org/mathjax/latest/MathJax.js', config: 'TeX-AMS_HTML-full' // See http://docs.mathjax.org/en/latest/config-files.html }, - + dependencies: [ { src: 'plugin/math/math.js', async: true } ] @@ -871,35 +1099,33 @@ The core of reveal.js is very easy to install. You'll simply need to download a ### Full setup -Some reveal.js features, like external markdown and speaker notes, require that presentations run from a local web server. The following instructions will set up such a server as well as all of the development tasks needed to make edits to the reveal.js source code. +Some reveal.js features, like external Markdown and speaker notes, require that presentations run from a local web server. The following instructions will set up such a server as well as all of the development tasks needed to make edits to the reveal.js source code. -1. Install [Node.js](http://nodejs.org/) +1. Install [Node.js](http://nodejs.org/) (1.0.0 or later) -2. Install [Grunt](http://gruntjs.com/getting-started#installing-the-cli) +1. Clone the reveal.js repository + ```sh + $ git clone https://github.com/hakimel/reveal.js.git + ``` -4. Clone the reveal.js repository -```sh -$ git clone https://github.com/hakimel/reveal.js.git -``` +1. Navigate to the reveal.js folder + ```sh + $ cd reveal.js + ``` -5. Navigate to the reveal.js folder -```sh -$ cd reveal.js -``` - -6. Install dependencies -```sh -$ npm install -``` +1. Install dependencies + ```sh + $ npm install + ``` -7. Serve the presentation and monitor source files for changes -```sh -$ grunt serve -``` +1. Serve the presentation and monitor source files for changes + ```sh + $ npm start + ``` -8. Open <http://localhost:8000> to view your presentation +1. Open <http://localhost:8000> to view your presentation -You can change the port by using `grunt serve --port 8001`. + You can change the port by using `npm start -- --port 8001`. ### Folder Structure @@ -909,25 +1135,8 @@ You can change the port by using `grunt serve --port 8001`. - **lib/** All other third party assets (JavaScript, CSS, fonts) -### Contributing - -Please keep the [issue tracker](http://github.com/hakimel/reveal.js/issues) limited to **bug reports**, **feature requests** and **pull requests**. If you are reporting a bug make sure to include information about which browser and operating system you are using as well as the necessary steps to reproduce the issue. - -If you have personal support questions use [StackOverflow](http://stackoverflow.com/questions/tagged/reveal.js). - - -#### Pull requests - -- Should follow the coding style of the file you work in, most importantly: - - Tabs to indent - - Single-quoted strings -- Should be made towards the **dev branch** -- Should be submitted from a feature/topic branch (not your master) -- Should not include the minified **reveal.min.js** or **reveal.min.css** files - - ## License MIT licensed -Copyright (C) 2013 Hakim El Hattab, http://hakim.se +Copyright (C) 2016 Hakim El Hattab, http://hakim.se |