diff options
Diffstat (limited to 'README.md')
| -rw-r--r-- | README.md | 199 |
1 files changed, 149 insertions, 50 deletions
@@ -1,8 +1,8 @@ -# reveal.js [](https://travis-ci.org/hakimel/reveal.js) +# reveal.js [](https://travis-ci.org/hakimel/reveal.js) <a href="https://slides.com?ref=github"><img src="https://s3.amazonaws.com/static.slid.es/images/slides-github-banner-320x40.png?1" alt="Slides" width="160" height="20"></a> A framework for easily creating beautiful presentations using HTML. [Check out the live demo](http://lab.hakim.se/reveal-js/). -reveal.js comes with a broad range of features including [nested slides](https://github.com/hakimel/reveal.js#markup), [Markdown contents](https://github.com/hakimel/reveal.js#markdown), [PDF export](https://github.com/hakimel/reveal.js#pdf-export), [speaker notes](https://github.com/hakimel/reveal.js#speaker-notes) and a [JavaScript API](https://github.com/hakimel/reveal.js#api). It's best viewed in a modern browser but [fallbacks](https://github.com/hakimel/reveal.js/wiki/Browser-Support) are available to make sure your presentation can still be viewed elsewhere. +reveal.js comes with a broad range of features including [nested slides](https://github.com/hakimel/reveal.js#markup), [Markdown contents](https://github.com/hakimel/reveal.js#markdown), [PDF export](https://github.com/hakimel/reveal.js#pdf-export), [speaker notes](https://github.com/hakimel/reveal.js#speaker-notes) and a [JavaScript API](https://github.com/hakimel/reveal.js#api). There's also a fully featured visual editor and platform for sharing reveal.js presentations at [slides.com](https://slides.com?ref=github). ## Table of contents - [Online Editor](#online-editor) @@ -60,7 +60,7 @@ reveal.js comes with a broad range of features including [nested slides](https:/ ## Online Editor -Presentations are written using HTML or Markdown but there's also an online editor for those of you who prefer a graphical interface. Give it a try at [http://slides.com](http://slides.com?ref=github). +Presentations are written using HTML or Markdown but there's also an online editor for those of you who prefer a graphical interface. Give it a try at [https://slides.com](https://slides.com?ref=github). ## Instructions @@ -105,25 +105,25 @@ The presentation markup hierarchy needs to be `.reveal > .slides > section` wher ### Markdown -It's possible to write your slides using Markdown. To enable Markdown, add the ```data-markdown``` attribute to your ```<section>``` elements and wrap the contents in a ```<script type="text/template">``` like the example below. +It's possible to write your slides using Markdown. To enable Markdown, add the `data-markdown` attribute to your `<section>` elements and wrap the contents in a `<textarea data-template>` like the example below. This is based on [data-markdown](https://gist.github.com/1343518) from [Paul Irish](https://github.com/paulirish) modified to use [marked](https://github.com/chjj/marked) to support [GitHub Flavored Markdown](https://help.github.com/articles/github-flavored-markdown). Sensitive to indentation (avoid mixing tabs and spaces) and line breaks (avoid consecutive breaks). ```html <section data-markdown> - <script type="text/template"> + <textarea data-template> ## Page title A paragraph with some text and a [link](http://hakim.se). - </script> + </textarea> </section> ``` #### External Markdown -You can write your content as a separate file and have reveal.js load it at runtime. Note the separator arguments which determine how slides are delimited in the external file. The ```data-charset``` attribute is optional and specifies which charset to use when loading the external file. +You can write your content as a separate file and have reveal.js load it at runtime. Note the separator arguments which determine how slides are delimited in the external file: the `data-separator` attribute defines a regular expression for horizontal slides (defaults to `^\r?\n---\r?\n$`, a newline-bounded horizontal rule) and `data-separator-vertical` defines vertical slides (disabled by default). The `data-separator-notes` attribute is a regular expression for specifying the beginning of the current slide's speaker notes (defaults to `note:`). The `data-charset` attribute is optional and specifies which charset to use when loading the external file. -When used locally, this feature requires that reveal.js [runs from a local web server](#full-setup). +When used locally, this feature requires that reveal.js [runs from a local web server](#full-setup). The following example customises all available options: ```html <section data-markdown="example.md" @@ -160,6 +160,19 @@ Special syntax (in html comment) is available for adding attributes to the slide </section> ``` +#### Configuring *marked* + +We use [marked](https://github.com/chjj/marked) to parse Markdown. To customise marked's rendering, you can pass in options when [configuring Reveal](#configuration): + +```javascript +Reveal.initialize({ + // Options which are passed into marked + // See https://github.com/chjj/marked#options-1 + markdown: { + smartypants: true + } +}); +``` ### Configuration @@ -198,6 +211,9 @@ Reveal.initialize({ // Change the presentation direction to be RTL rtl: false, + // Randomizes the order of slides each time the presentation loads + shuffle: false, + // Turns fragments on and off globally fragments: true, @@ -220,6 +236,9 @@ Reveal.initialize({ // Stop auto-sliding after user input autoSlideStoppable: true, + // Use this method for navigation when auto-sliding + autoSlideMethod: Reveal.navigateNext, + // Enable slide navigation via mouse wheel mouseWheel: false, @@ -230,13 +249,13 @@ Reveal.initialize({ previewLinks: false, // Transition style - transition: 'default', // none/fade/slide/convex/concave/zoom + transition: 'slide', // none/fade/slide/convex/concave/zoom // Transition speed transitionSpeed: 'default', // default/fast/slow // Transition style for full page slide backgrounds - backgroundTransition: 'default', // none/fade/slide/convex/concave/zoom + backgroundTransition: 'fade', // none/fade/slide/convex/concave/zoom // Number of slides away from the current that are visible viewDistance: 3, @@ -251,7 +270,10 @@ Reveal.initialize({ // - Calculated automatically unless specified // - Set to 0 to disable movement along an axis parallaxBackgroundHorizontal: null, - parallaxBackgroundVertical: null + parallaxBackgroundVertical: null, + + // The display mode that will be used to show slides + display: 'block' }); ``` @@ -295,6 +317,20 @@ Reveal.initialize({ }); ``` +If you wish to disable this behavior and do your own scaling (e.g. using media queries), try these settings: + +```javascript +Reveal.initialize({ + + ... + + width: "100%", + height: "100%", + margin: 0, + minScale: 1, + maxScale: 1 +}); +``` ### Dependencies @@ -331,6 +367,7 @@ You can add your own extensions using the same syntax. The following properties - **callback**: [optional] Function to execute when the script has loaded - **condition**: [optional] Function which must return true for the script to be loaded +To load these dependencies, reveal.js requires [head.js](http://headjs.com/) *(a script loading library)* to be loaded before reveal.js. ### Ready Event @@ -342,6 +379,7 @@ Reveal.addEventListener( 'ready', function( event ) { } ); ``` +Note that we also add a `.ready` class to the `.reveal` element so that you can hook into this with CSS. ### Auto-sliding @@ -365,6 +403,8 @@ You can also override the slide duration for individual slides and fragments by </section> ``` +To override the method used for navigation when auto-sliding, you can specify the ```autoSlideMethod``` setting. To only navigate along the top layer and ignore vertical slides, set this to ```Reveal.navigateRight```. + Whenever the auto-slide mode is resumed or paused the ```autoslideresumed``` and ```autoslidepaused``` events are fired. @@ -423,11 +463,18 @@ Reveal.next(); Reveal.prevFragment(); Reveal.nextFragment(); +// Randomize the order of slides +Reveal.shuffle(); + // Toggle presentation states, optionally pass true/false to force on/off Reveal.toggleOverview(); Reveal.togglePause(); Reveal.toggleAutoSlide(); +// Shows a help overlay with keyboard shortcuts, optionally pass true/false +// to force on/off +Reveal.toggleHelp(); + // Change a config value at runtime Reveal.configure({ controls: true }); @@ -499,26 +546,59 @@ Reveal.addEventListener( 'somestate', function() { ### Slide Backgrounds -Slides are contained within a limited portion of the screen by default to allow them to fit any display and scale uniformly. You can apply full page backgrounds outside of the slide area by adding a ```data-background``` attribute to your ```<section>``` elements. Four different types of backgrounds are supported: color, image, video and iframe. Below are a few examples. +Slides are contained within a limited portion of the screen by default to allow them to fit any display and scale uniformly. You can apply full page backgrounds outside of the slide area by adding a ```data-background``` attribute to your ```<section>``` elements. Four different types of backgrounds are supported: color, image, video and iframe. +##### Color Backgrounds +All CSS color formats are supported, like rgba() or hsl(). ```html -<section data-background="#ff0000"> - <h2>All CSS color formats are supported, like rgba() or hsl().</h2> +<section data-background-color="#ff0000"> + <h2>Color</h2> </section> -<section data-background="http://example.com/image.png"> - <h2>This slide will have a full-size background image.</h2> +``` + +##### Image Backgrounds +By default, background images are resized to cover the full page. Available options: + +| Attribute | Default | Description | +| :--------------------------- | :--------- | :---------- | +| data-background-image | | URL of the image to show. GIFs restart when the slide opens. | +| data-background-size | cover | See [background-size](https://developer.mozilla.org/docs/Web/CSS/background-size) on MDN. | +| data-background-position | center | See [background-position](https://developer.mozilla.org/docs/Web/CSS/background-position) on MDN. | +| data-background-repeat | no-repeat | See [background-repeat](https://developer.mozilla.org/docs/Web/CSS/background-repeat) on MDN. | +```html +<section data-background-image="http://example.com/image.png"> + <h2>Image</h2> </section> -<section data-background="http://example.com/image.png" data-background-size="100px" data-background-repeat="repeat"> - <h2>This background image will be sized to 100px and repeated.</h2> +<section data-background-image="http://example.com/image.png" data-background-size="100px" data-background-repeat="repeat"> + <h2>This background image will be sized to 100px and repeated</h2> </section> -<section data-background-video="https://s3.amazonaws.com/static.slid.es/site/homepage/v1/homepage-video-editor.mp4,https://s3.amazonaws.com/static.slid.es/site/homepage/v1/homepage-video-editor.webm" data-background-video-loop> - <h2>Video. Multiple sources can be defined using a comma separated list. Video will loop when the data-background-video-loop attribute is provided.</h2> +``` + +##### Video Backgrounds +Automatically plays a full size video behind the slide. + +| Attribute | Default | Description | +| :--------------------------- | :------ | :---------- | +| data-background-video | | A single video source, or a comma separated list of video sources. | +| data-background-video-loop | false | Flags if the video should play repeatedly. | +| data-background-video-muted | false | Flags if the audio should be muted. | +| data-background-size | cover | Use `cover` for full screen and some cropping or `contain` for letterboxing. | + +```html +<section data-background-video="https://s3.amazonaws.com/static.slid.es/site/homepage/v1/homepage-video-editor.mp4,https://s3.amazonaws.com/static.slid.es/site/homepage/v1/homepage-video-editor.webm" data-background-video-loop data-background-video-muted> + <h2>Video</h2> </section> +``` + +##### Iframe Backgrounds +Embeds a web page as a background. Note that since the iframe is in the background layer, behind your slides, it is not possible to interact with the embedded page. +```html <section data-background-iframe="https://slides.com"> - <h2>Embeds a web page as a background. Note that the page won't be interactive.</h2> + <h2>Iframe</h2> </section> ``` +##### Background Transitions Backgrounds transition using a fade animation by default. This can be changed to a linear sliding transition by passing ```backgroundTransition: 'slide'``` to the ```Reveal.initialize()``` call. Alternatively you can set ```data-background-transition``` on any section with a background to override that specific transition. @@ -565,15 +645,15 @@ You can also use different in and out transitions for the same slide: ```html <section data-transition="slide"> - The train goes on … + The train goes on … </section> -<section data-transition="slide"> - and on … +<section data-transition="slide"> + and on … </section> -<section data-transition="slide-in fade-out"> +<section data-transition="slide-in fade-out"> and stops. </section> -<section data-transition="fade-in slide-out"> +<section data-transition="fade-in slide-out"> (Passengers entering and leaving) </section> <section data-transition="slide"> @@ -613,6 +693,7 @@ The default fragment style is to start out invisible and fade in. This style can <p class="fragment grow">grow</p> <p class="fragment shrink">shrink</p> <p class="fragment fade-out">fade-out</p> + <p class="fragment fade-up">fade-up (also down, left and right!)</p> <p class="fragment current-visible">visible only once</p> <p class="fragment highlight-current-blue">blue only once</p> <p class="fragment highlight-red">highlight-red</p> @@ -768,16 +849,34 @@ Reveal.initialize({ ## PDF Export -Presentations can be exported to PDF via a special print stylesheet. This feature requires that you use [Google Chrome](http://google.com/chrome) or [Chromium](https://www.chromium.org/Home). +Presentations can be exported to PDF via a special print stylesheet. This feature requires that you use [Google Chrome](http://google.com/chrome) or [Chromium](https://www.chromium.org/Home) and to be serving the presention from a webserver. Here's an example of an exported presentation that's been uploaded to SlideShare: http://www.slideshare.net/hakimel/revealjs-300. -1. Open your presentation with `print-pdf` included anywhere in the query string. This triggers the default index HTML to load the PDF print stylesheet ([css/print/pdf.css](https://github.com/hakimel/reveal.js/blob/master/css/print/pdf.css)). You can test this with [lab.hakim.se/reveal-js?print-pdf](http://lab.hakim.se/reveal-js?print-pdf). -2. Open the in-browser print dialog (CMD+P). -3. Change the **Destination** setting to **Save as PDF**. -4. Change the **Layout** to **Landscape**. -5. Change the **Margins** to **None**. -6. Enable the **Background graphics** option. -7. Click **Save**. +### Page size +Export dimensions are inferred from the configured [presentation size](#presentation-size). Slides that are too tall to fit within a single page will expand onto multiple pages. You can limit how many pages a slide may expand onto using the `pdfMaxPagesPerSlide` config option, for example `Reveal.configure({ pdfMaxPagesPerSlide: 1 })` ensures that no slide ever grows to more than one printed page. + +### Print stylesheet +To enable the PDF print capability in your presentation, the special print stylesheet at [/css/print/pdf.css](https://github.com/hakimel/reveal.js/blob/master/css/print/pdf.css) must be loaded. The default index.html file handles this for you when `print-pdf` is included in the query string. If you're using a different HTML template, you can add this to your HEAD: + +```html +<script> + var link = document.createElement( 'link' ); + link.rel = 'stylesheet'; + link.type = 'text/css'; + link.href = window.location.search.match( /print-pdf/gi ) ? 'css/print/pdf.css' : 'css/print/paper.css'; + document.getElementsByTagName( 'head' )[0].appendChild( link ); +</script> +``` + +### Instructions +1. Open your presentation with `print-pdf` included in the query string i.e. http://localhost:8000/?print-pdf. You can test this with [lab.hakim.se/reveal-js?print-pdf](http://lab.hakim.se/reveal-js?print-pdf). + * If you want to include [speaker notes](#speaker-notes) in your export, you can append `showNotes=true` to the query string: http://localhost:8000/?print-pdf&showNotes=true +1. Open the in-browser print dialog (CTRL/CMD+P). +1. Change the **Destination** setting to **Save as PDF**. +1. Change the **Layout** to **Landscape**. +1. Change the **Margins** to **None**. +1. Enable the **Background graphics** option. +1. Click **Save**. 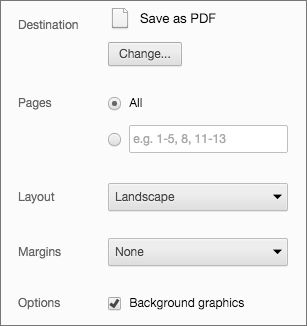 @@ -810,6 +909,8 @@ If you want to add a theme of your own see the instructions here: [/css/theme/RE reveal.js comes with a speaker notes plugin which can be used to present per-slide notes in a separate browser window. The notes window also gives you a preview of the next upcoming slide so it may be helpful even if you haven't written any notes. Press the 's' key on your keyboard to open the notes window. +A speaker timer starts as soon as the speaker view is opened. You can reset it to 00:00:00 at any time by simply clicking/tapping on it. + Notes are defined by appending an ```<aside>``` element to a slide as seen below. You can add the ```data-markdown``` attribute to the aside element if you prefer writing notes using Markdown. Alternatively you can add your notes in a `data-notes` attribute on the slide. Like `<section data-notes="Something important"></section>`. @@ -844,7 +945,7 @@ This will only display in the notes window. Notes are only visible to the speaker inside of the speaker view. If you wish to share your notes with others you can initialize reveal.js with the `showNotes` config value set to `true`. Notes will appear along the bottom of the presentations. -When `showNotes` is enabled notes are also included when you [export to PDF](https://github.com/hakimel/reveal.js#pdf-export). +When `showNotes` is enabled notes are also included when you [export to PDF](https://github.com/hakimel/reveal.js#pdf-export). By default, notes are printed in a semi-transparent box on top of the slide. If you'd rather print them on a separate page after the slide, set `showNotes: "separate-page"`. ## Server Side Speaker Notes @@ -863,7 +964,7 @@ Reveal.initialize({ Then: -1. Install [Node.js](http://nodejs.org/) +1. Install [Node.js](http://nodejs.org/) (4.0.0 or later) 2. Run ```npm install``` 3. Run ```node plugin/notes-server``` @@ -881,7 +982,7 @@ The multiplex plugin needs the following 3 things to operate: More details: #### Master presentation -Served from a static file server accessible (preferably) only to the presenter. This need only be on your (the presenter's) computer. (It's safer to run the master presentation from your own computer, so if the venue's Internet goes down it doesn't stop the show.) An example would be to execute the following commands in the directory of your master presentation: +Served from a static file server accessible (preferably) only to the presenter. This need only be on your (the presenter's) computer. (It's safer to run the master presentation from your own computer, so if the venue's Internet goes down it doesn't stop the show.) An example would be to execute the following commands in the directory of your master presentation: 1. ```npm install node-static``` 2. ```static``` @@ -1006,7 +1107,7 @@ Reveal.initialize({ If you want to display math equations in your presentation you can easily do so by including this plugin. The plugin is a very thin wrapper around the [MathJax](http://www.mathjax.org/) library. To use it you'll need to include it as a reveal.js dependency, [find our more about dependencies here](#dependencies). -The plugin defaults to using [LaTeX](http://en.wikipedia.org/wiki/LaTeX) but that can be adjusted through the ```math``` configuration object. Note that MathJax is loaded from a remote server. If you want to use it offline you'll need to download a copy of the library and adjust the ```mathjax``` configuration value. +The plugin defaults to using [LaTeX](http://en.wikipedia.org/wiki/LaTeX) but that can be adjusted through the ```math``` configuration object. Note that MathJax is loaded from a remote server. If you want to use it offline you'll need to download a copy of the library and adjust the ```mathjax``` configuration value. Below is an example of how the plugin can be configured. If you don't intend to change these values you do not need to include the ```math``` config object at all. @@ -1019,7 +1120,7 @@ Reveal.initialize({ mathjax: 'https://cdn.mathjax.org/mathjax/latest/MathJax.js', config: 'TeX-AMS_HTML-full' // See http://docs.mathjax.org/en/latest/config-files.html }, - + dependencies: [ { src: 'plugin/math/math.js', async: true } ] @@ -1049,33 +1150,31 @@ The core of reveal.js is very easy to install. You'll simply need to download a Some reveal.js features, like external Markdown and speaker notes, require that presentations run from a local web server. The following instructions will set up such a server as well as all of the development tasks needed to make edits to the reveal.js source code. -1. Install [Node.js](http://nodejs.org/) - -2. Install [Grunt](http://gruntjs.com/getting-started#installing-the-cli) +1. Install [Node.js](http://nodejs.org/) (4.0.0 or later) -4. Clone the reveal.js repository +1. Clone the reveal.js repository ```sh $ git clone https://github.com/hakimel/reveal.js.git ``` -5. Navigate to the reveal.js folder +1. Navigate to the reveal.js folder ```sh $ cd reveal.js ``` -6. Install dependencies +1. Install dependencies ```sh $ npm install ``` -7. Serve the presentation and monitor source files for changes +1. Serve the presentation and monitor source files for changes ```sh - $ grunt serve + $ npm start ``` -8. Open <http://localhost:8000> to view your presentation +1. Open <http://localhost:8000> to view your presentation - You can change the port by using `grunt serve --port 8001`. + You can change the port by using `npm start -- --port=8001`. ### Folder Structure @@ -1089,4 +1188,4 @@ Some reveal.js features, like external Markdown and speaker notes, require that MIT licensed -Copyright (C) 2016 Hakim El Hattab, http://hakim.se +Copyright (C) 2017 Hakim El Hattab, http://hakim.se |